

This article describes how to use IoT Studio to develop your own web application on the Alibaba Cloud IoT platform, so that there can be multiple points in the same control, and each point displays its own information. The user does not need to know how many devices in advance.
The specific steps are described below.
One, create a new web application
The premise of creating a new Web application is that a project has been established.
How to build a project on Alibaba Cloud, you can refer to the previous article How to build a new project based on the public IoT Studio project of the Alibaba Cloud IoT platform.
Here, we will no longer introduce how to create a project, but on the basis of the original project, add a new web application.
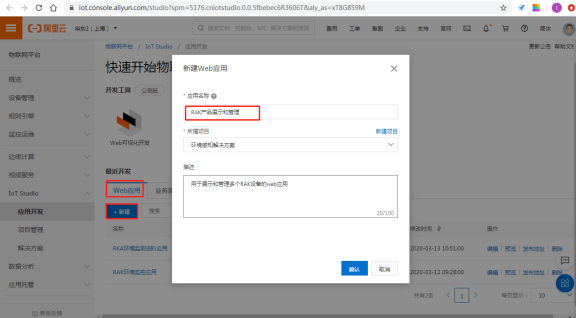
Alibaba Cloud, IoT platform, create your own web application
Figure 1 Alibaba Cloud IoT platform creates its own web application
The method of creating a new web application is shown in Figure 1. The “application name” can be determined by yourself, the “belonging project” can be selected from the previously created project “environmental awareness solution”, and the “description” can be written about the application Explain, lest there are too many applications and can’t remember what an application is used for.
Two, create a menu
This step is used to create the menu of the user interface.
It should be noted that the sub-menus included in the menu here should correspond to the pages added in the next step. As shown in Figure 2, select the navigation layout and click “Add Main Menu”.
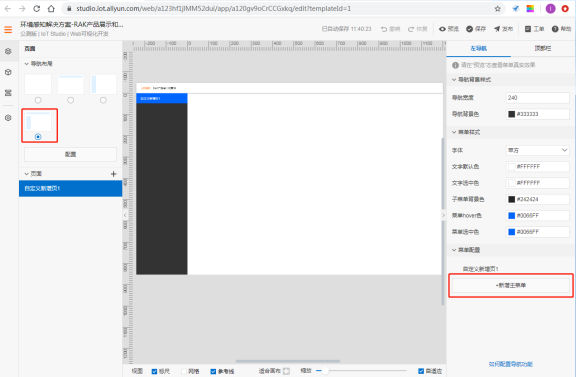
Alibaba Cloud. Internet of Things Platform. Solution. Add Main Menu
Figure 2 Adding the main menu to the solution on the Alibaba Cloud IoT platform
On the interface shown in Figure 2, click “New Main Menu” to add four menus: “Overview of Device Operation”, “Device Management”, “Device Properties” and “RAK Product Display”.
Three, add a page
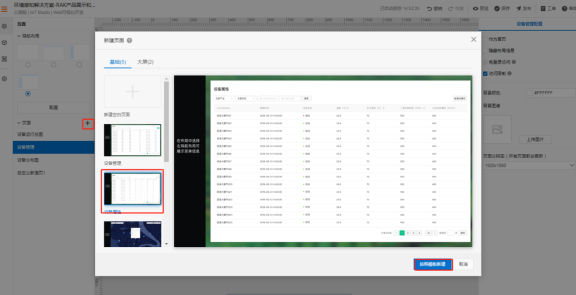
1. Add “equipment operation map” page
As shown in Figure 3, click “+” in the interface shown in Figure 3 to create a new page. When creating a new page, you can select a template, for example, select the “General Device Operation and Maintenance Large Screen” template under “Big Screen”.
You can also modify the name of the above-mentioned newly added page, for example, modify the page name to “equipment operation general map”.
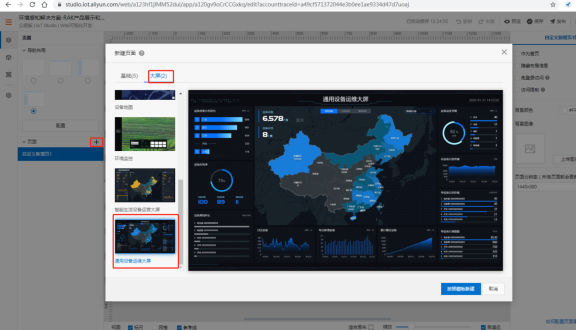
Alibaba Cloud, Internet of Things platform, solutions, add device operation overview
Figure 3 The general page of adding devices to the solution on the Alibaba Cloud IoT platform
2. Add “Device Management” page
Create a new page, as shown in Figure 4, and select the “Device Management” template. Modify the page name to “device management” to get the device management page.
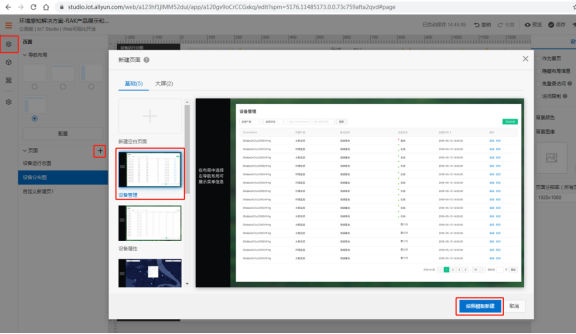
Alibaba Cloud, IoT platform, web application selection, device management template.
Figure 4 Alibaba Cloud Internet of Things platform selects the device management template of the web application
3. Set access permissions
On the interface shown in Figure 5, check “Access Rights”.
Available options include “free login access” and “access restriction”. Among them, you need to set up authentication in “Application Settings” first, and then follow the prompts to operate.
In the interface shown in Figure 5, you can also set a background image.
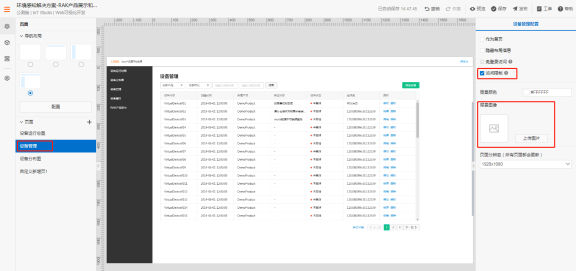
Alibaba Cloud, Internet of Things platform, setting up web applications, access permissions
Figure 5 Setting access permissions for web applications on the Alibaba Cloud IoT platform
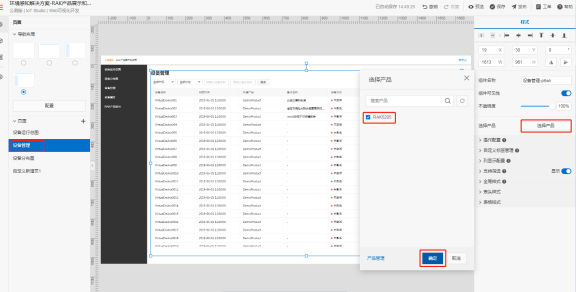
4. Choose a product
In the interface shown in Figure 6, you can click “Select Product”. At this time, all the products you created before can be selected. You can select one product at a time or multiple products at once.
As shown in Figure 6, after clicking “Select Product”, a window will pop up, in this window there is a product list (currently only RAK5205 is available for selection), you can select the product RAK5205.
Click “Product Management”, you can also associate more products, you can also create products. For details on how to associate products or create products on the Alibaba Cloud IoT platform, you can check the previous article How to add your own LoRa node device on the Alibaba Cloud IoT platform.
It should be noted that clicking in the middle of the “Device Management” page will display the “Select Product” page as shown on the right side of Figure 4.
Alibaba Cloud, IoT platform, select products for web applications
Figure 6 Alibaba Cloud IoT platform selects products for web applications
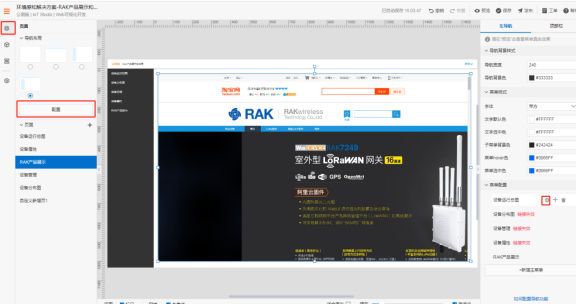
5. Add the “Device Properties” page
Click the “+” shown in Figure 7 to create a new page, and select the “Device Properties” template. The page name can be modified, for example, to “device attributes”.
Similarly, you can also set permissions, such as checking “Login-free access” and setting a background image.
Alibaba Cloud, IoT platform, web application, adding device attributes
Figure 7 Add device property page for web application on Alibaba Cloud IoT platform
By clicking on the middle position of the interface shown in Figure 7, a column of “Choose Product” can appear on the right. Similarly, you can select an existing product, or newly create or newly associate other products.
In this way, we have created all the pages. Next, we will bind the pages to the main menu.
Four, menu and page binding
1. Bind a single page with a single menu
Click the page icon on the left to switch to the page interface, as shown in Figure 8.
On the interface shown in Figure 8, click “Configuration”.
At this time, at the bottom of the right column, “Menu Configuration” appears, which will display the menu you created according to the method described in the second part above. When you hover the mouse on the name of a menu, as shown in Figure 8, when hovering on the menu “equipment operation general map”, three small buttons will appear on the right, the first one (that is, the red square circled Circled, this is added to this article, the Alibaba Cloud platform does not have the red square) button is used to bind the page for this menu.
Alibaba Cloud, IoT platform, binding web application
Figure 8 Schematic diagram of the page and menu of the web application bound to the Alibaba Cloud IoT platform
Click the first button, and a small window as shown in Figure 9 will appear.
As shown in Figure 9, at the “target link” will automatically list all the current application pages, that is, the pages you created in accordance with the method described in the third part.
Click to select the page in the circle in front of one of the pages, and click “OK”, then the page is bound to the menu “Overview of Device Operation”.

Alibaba Cloud, Internet of Things, Web application, binding method
Figure 9 Schematic diagram of binding method of pages and menus of Alibaba Cloud IoT platform web applications
According to the above method, you can bind the remaining pages and menus in turn.
2. Set the home page
We need to set the first page that the user sees after logging in, which is the home page. As shown in Figure 10, here we set the “device running map” to “homepage” and tick “free login access”.
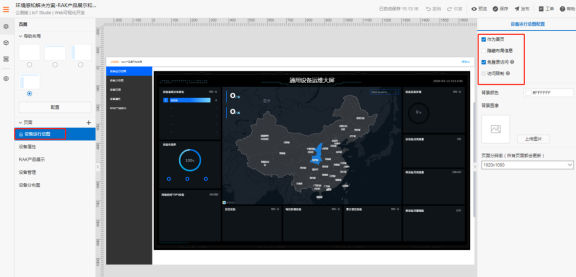
Alibaba Cloud, Internet of Things platform, set the home page of the web application
Figure 10 Alibaba Cloud Internet of Things platform settings web application homepage
Check “Access Permission” on the “Device Management” page, and check “Login-free access” on other pages. In this way, the application is developed, and the application can be published below.
Five, publish the application
As shown in Figure 11, after binding the page and menu, click the “Save” button in the upper right corner of IoT Studio, and then click “Preview”. If there is no problem, click “Publish” and fill in the release information.
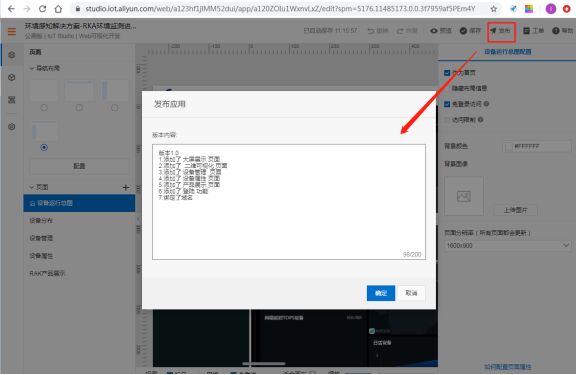
Alibaba Cloud, Internet of Things platform, publish web applications
Figure 11 Publish web applications on the Alibaba Cloud IoT platform
Click “OK” to bind the domain name, and you can view the display effect through the domain name.
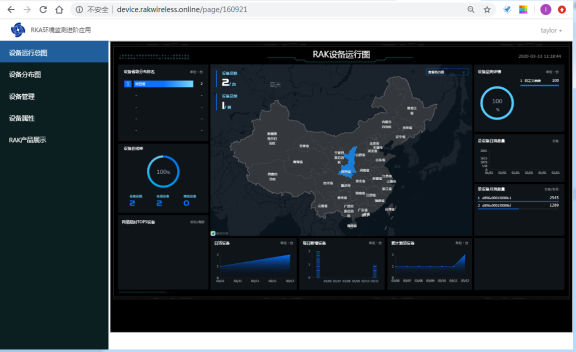
Six, view the effect of Web applications
The browser enters the bound domain name to open the web application.
The home page is shown in Figure 12.
Click on the names of the other pages shown in the left column of Figure 12 in turn to display the status of other pages. So far, a basic multi-device display and management application has been built.
Alibaba Cloud, IoT platform, IoT Studio, build web applications
Figure 12 Schematic diagram of the homepage of the web application built with the IoT Studio of the Alibaba Cloud IoT platform
Conclusion
This article describes how to build a basic multi-device display and management Web application on the Alibaba Cloud Internet of Things platform according to personal business needs.
For more information, please visit the official website of Shenzhen RAKwireless Technology Co., Ltd. RAKwireless.com , or email info@rakwireless.com for consultation.
Guest Post Service By www.guestarticlehouse.com